Tagging
Yay, I finally get to talk about Fablehenge's most exciting feature. Fablehenge began when I was complaining to Jen about not being able to keep track of all my character's details. I tried a variety of tools; the most useful was actually a sort of wiki syntax, but that didn't help me to link the characters to each scene. We discussed it for a while and she said it sounded like I needed Facebook for my characters.
In Fablehenge, you can create a separate "profile" for each of your characters, settings, plot points, and key objects. You can link these profiles to each other (like a "Friends list"). Most importantly, you can tag each of these features in the scenes that they appear in, effectively creating a "timeline view" for each of them.
Most social media platforms overload the use of the word "tag". If you use the "hashtag" (#) character in a post, you are "tagging" that post as being associated with the given word. Most of them let you click the tag to see other posts that are also tagged with that word. But if you use the "at" (@) character is a post, you are "tagging" another person that either appears in the post or whose attention you want to draw to the post. Clicking the person's name then takes you through to their profile on the given social media site.
Fablehenge tagging is more like the second kind of tagging, where you can mention a character (for example), which automatically links the character to the scene.
Creating your first tag
Click the tag icon on the toolbar:

The "Add or create tag" window should pop up instantly (We want adding tags to be as non-interruptive as possible, so we optimized the speed of this window). It looks like this to begin with:
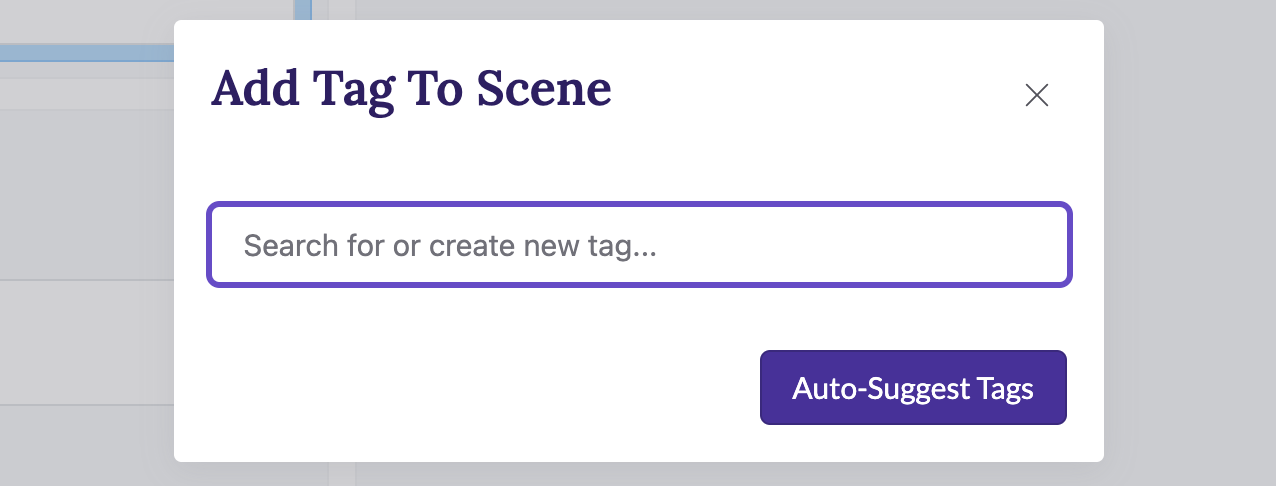
As the placeholder text hints, you can use this box both to create brand new tags and to add existing tags to the current scene. When you create a new tag, it is automatically added to the scene. In the text box, start typing the name you want to give the tag:
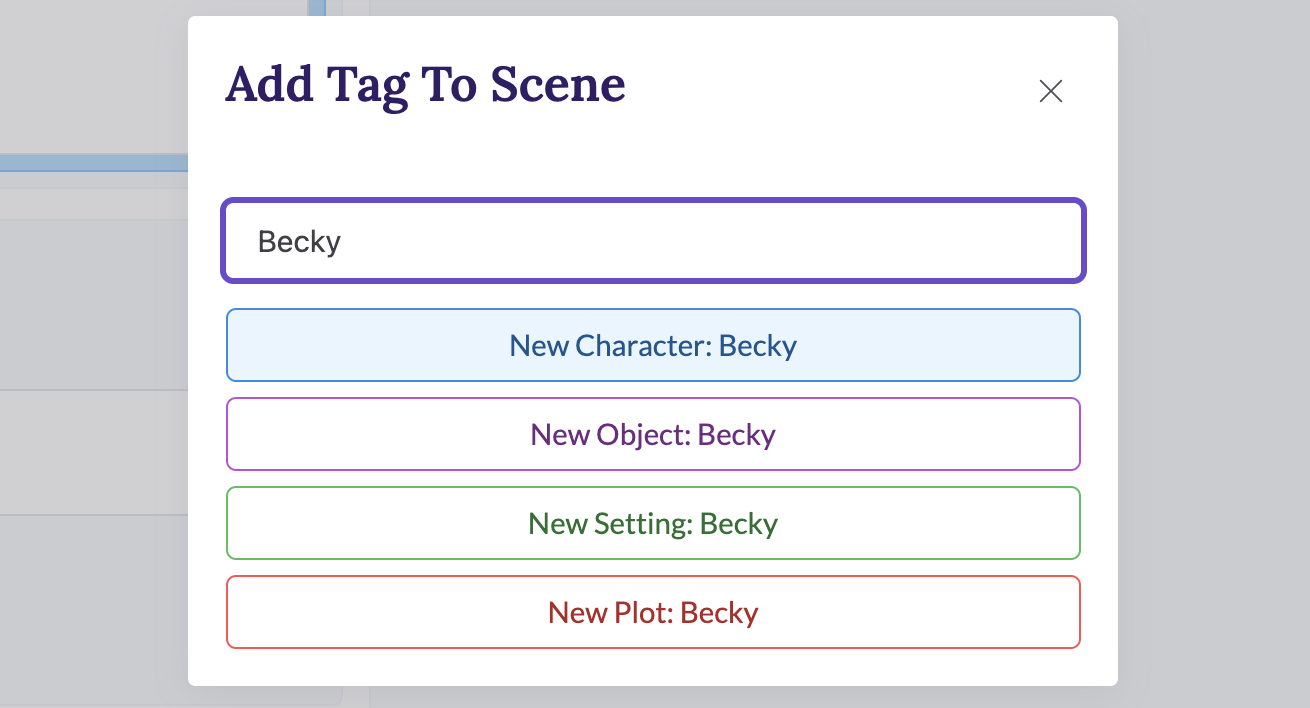
As you can see, there are four different "categories" of tags. As you'll see, we allow you to select a tag category when you set up the tag itself. The tag categories are:
| Tag Category | Description | Colour |
|---|---|---|
| Character | A character in your story. Probably a person, but depending on the story it may be an animal or even an anthropomorphic object. | Blue |
| Object | A significant object or artifact in your story. | Purple |
| Setting | A place or location in your story. These can also come at multiple scales; it might be a room, a town, or a planet, for example. | Green |
| Plot Point | These represent key pieces of your story structure. It might be a plot point or an entire subplot. It might represent a promise you've made to the reader and the expected outcome. | Red |
We've given the categories different colours so you can tell at a glance what type you are looking at.
In this case, the New Character: Becky box is currently selected. You can use
arrow keys on the keyboard to move up or down to create a tag of a different
category. You can also use the mouse to click any of the boxes directly.
Becky is a character in this story, so click New Character: Becky or press
Enter. The tagging window closes and goes back to the manuscript.
That's it! You've created a tag and attached it to the scene. We haven't added any details about the character yet, but we know she exists and we know she is in this scene.
Creating tags using the keyboard
While editing your document, you can pop up the Create or add tag window by
typing either a # or a @ character, reminiscent of social media. Then you can
type the name of the new character in the box and create the tag as discussed
above.
There is a subtle difference between # and @. If you use the # key to pop up the box, then it behaves the same as if you had used the mouse. However, if you use the @ symbol, it will not only create and add the tag to the scene, it will also insert the character's name into the document.
So you can type something like @Boris<enter> to create a new tag, and your manuscript will contain the name "Boris" when you're finished adding the tag.
This is useful when using the box to add existing tags to the scene. You only
need a couple extra keystrokes to add a character and insert their name without
breaking flow: An @ and an enter (and maybe a couple arrow keys).
Adding an existing tag to a scene
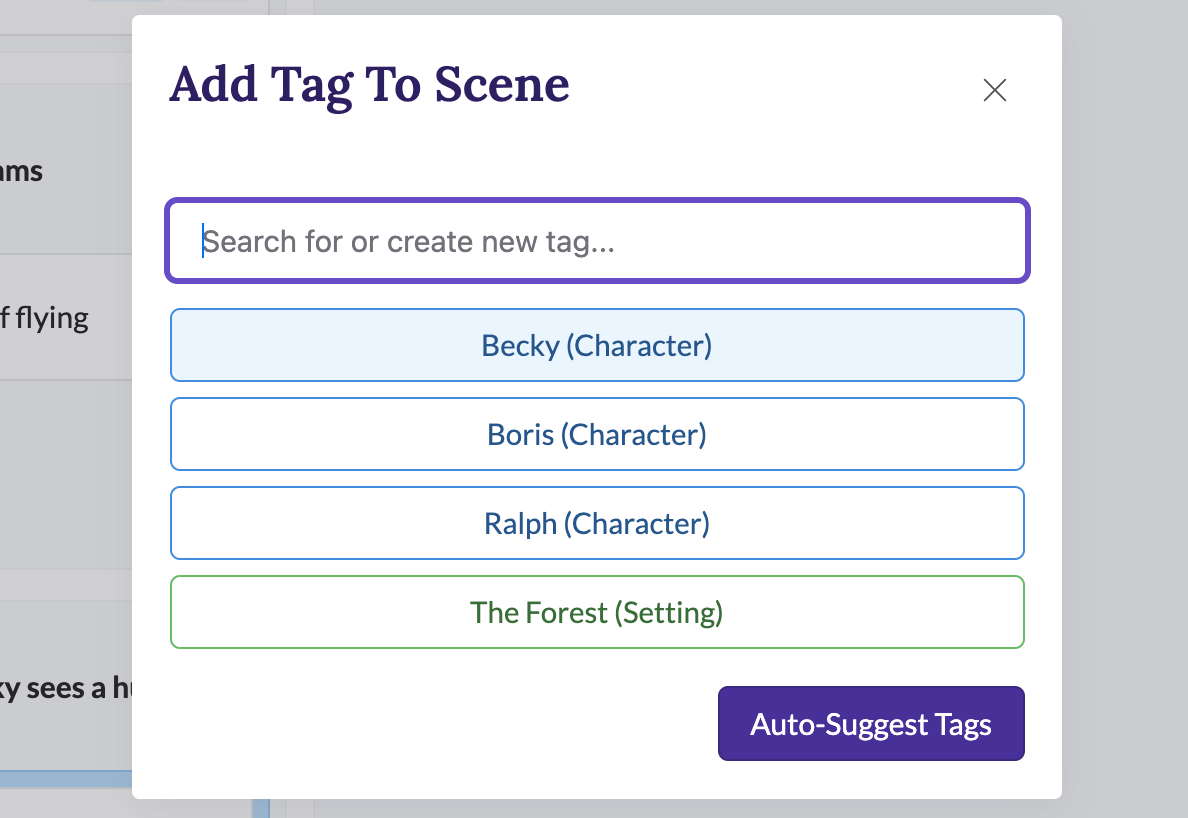
Becky is our main character, so she's probably going to show up in a lot of scenes. Select a different scene that she hasn't been tagged in yet or create a new scene. Click the new tag button, or type # or @, to show the add or create box. Now that we have a couple tags in the system, it looks like this:
You can use arrow keys to select one of the three characters and press enter
to add them to the scene. Or you can click on the desired character.
You can also start typing the name of the target tag in the box. The list will
instantly filter out any names that don't contain the letters you type. Since
Ralph and The Forest don't have B in their names, they disappear after I
type one letter:
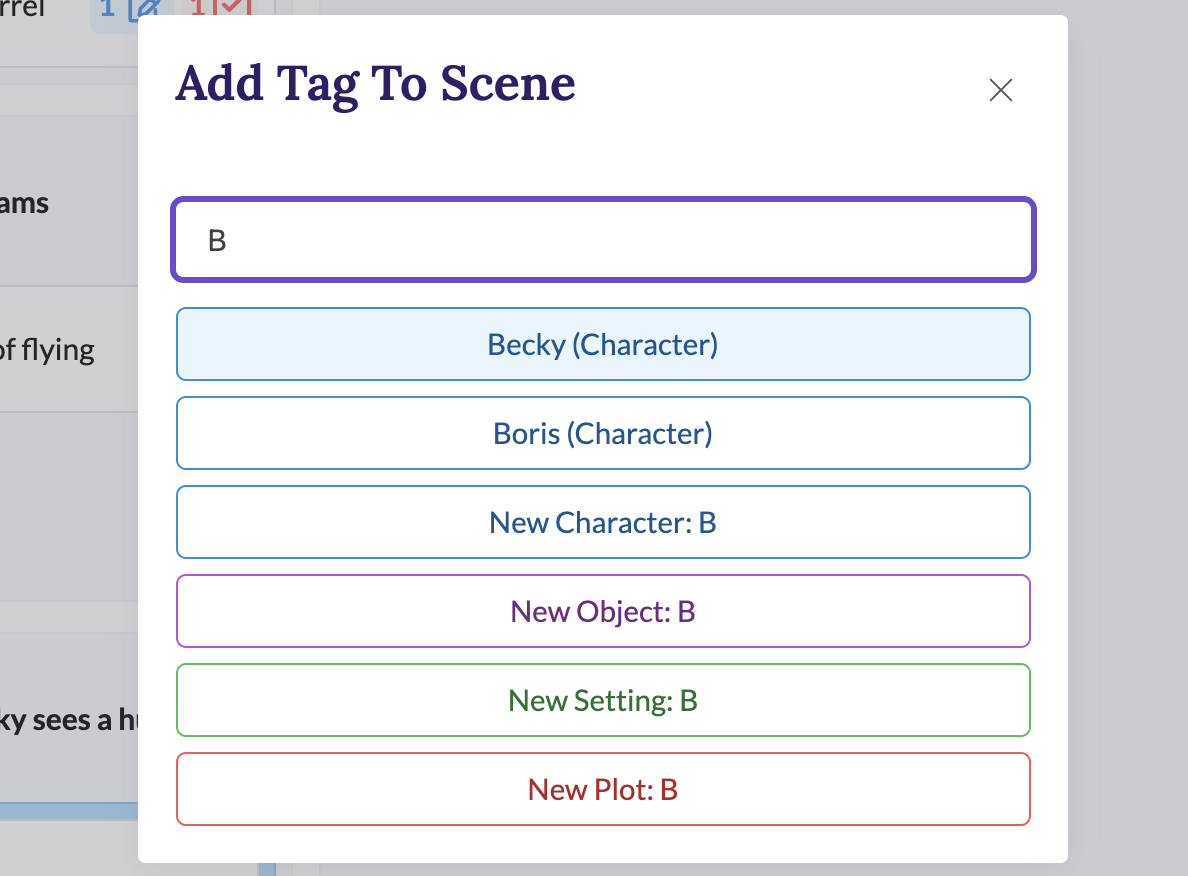
Now only the existing Becky and Boris characters are visible because they are
the only ones that contain a B. We use a smart filtering strategy when
searching names, so you don't have to type all the letters of a name to
identify one.
Notice also that after you start typing a word, you once again have the option
of creating a new tag in one of the five categories, as well as selecting the
Becky character.
You can also add a pre-existing tag to the current scene with the mouse using the tag sidebar.
The tag sidebar
All tags in the book are visible in the tag sidebar on the right side of the manuscript:
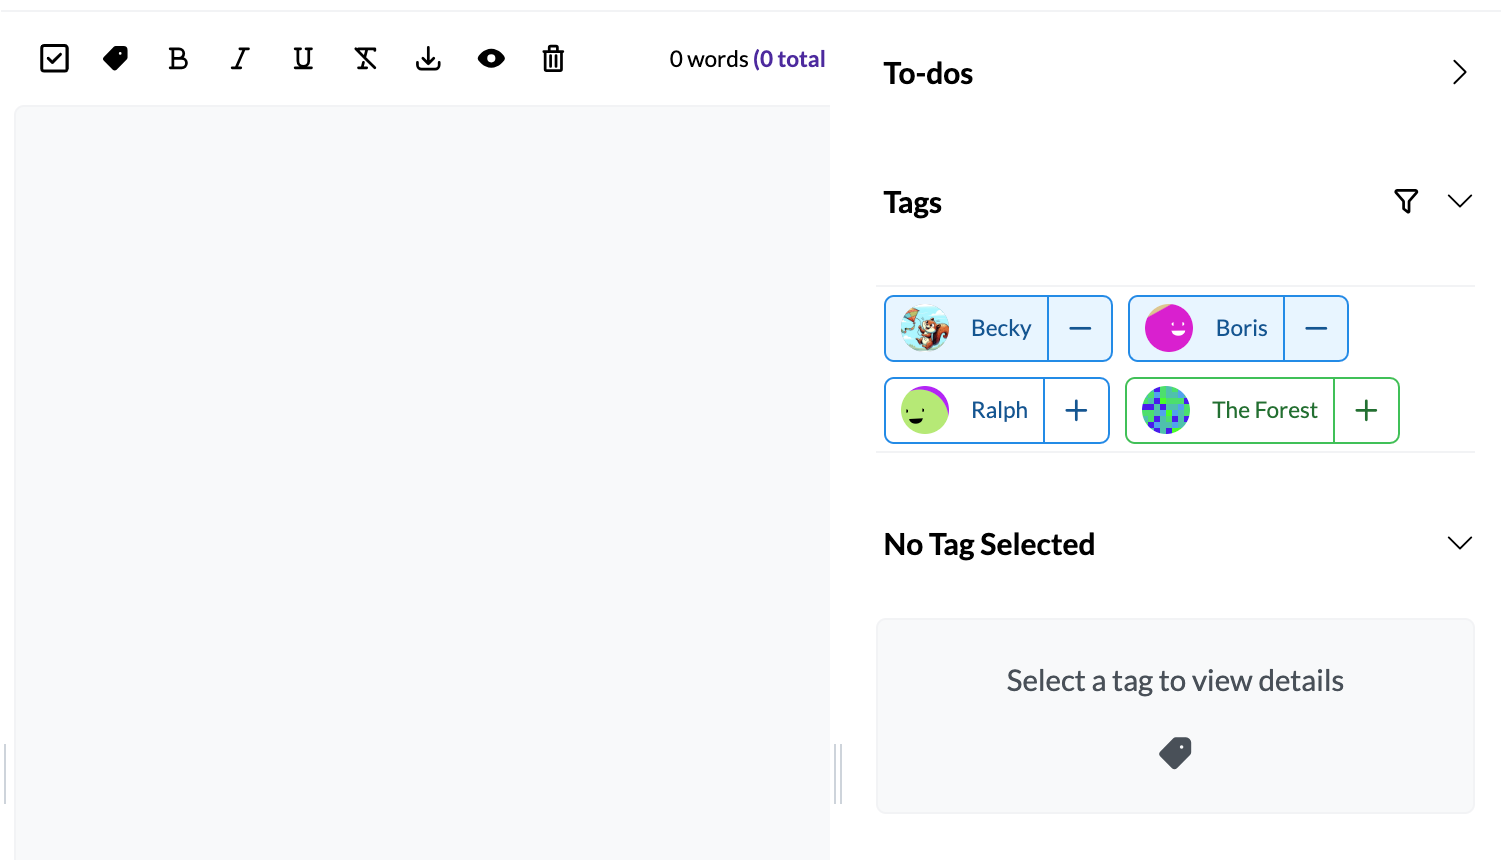
If a particular tag is already attached to the current scene, it is displayed with a background colour; otherwise it is displayed with a white background and outline. In this example, Becky and Boris are in the scene, but Ralph and The Forest are not.
For tags that are not attached to the current scene, such as Ralph in the image above, you can attach them to the scene by clicking the "plus" icon next to the name. If they are in the scene, you can press the "minus" icon to remove them from the scene (but not the book).
Notice that each tag is given a unique icon to help you visually identify it. You can customize these by setting the profile image in the Tag Details section, discussed next.
Selecting a Tag
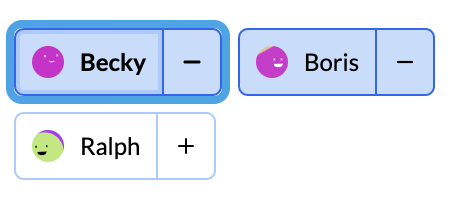
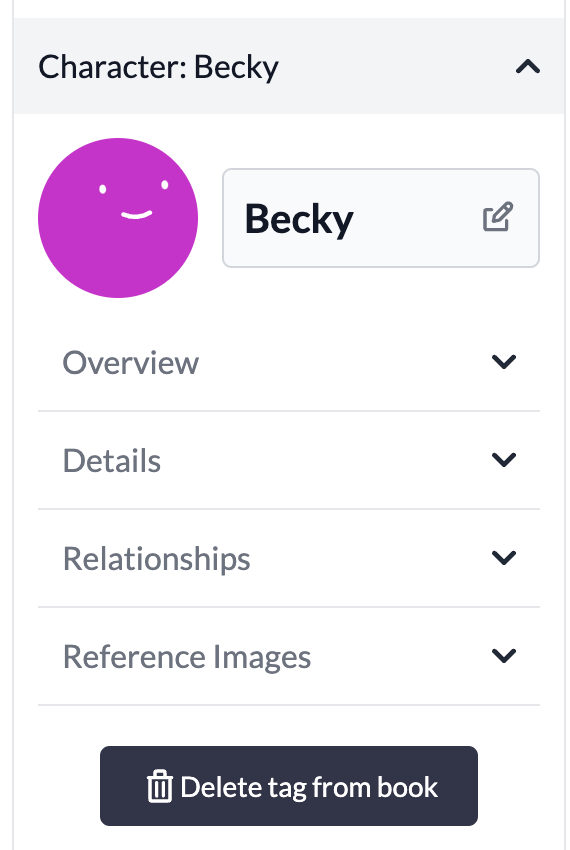
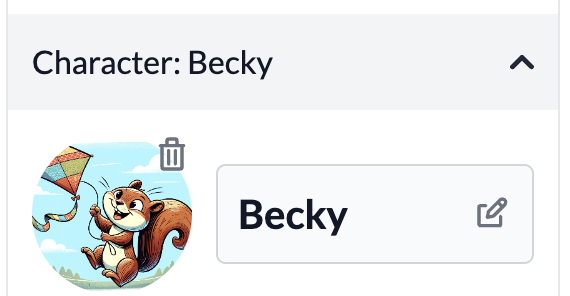
Now that you know how to attach tags to scenes, you're ready to start setting up the equivalent of the tag's "social profile." Click a tag name in the sidebar (it doesn't matter if they are currently in the scene or not). This will mark the tag as selected, indicated by a thicker outline around it:
Details about the tag will show up in a new section in the sidebar. Since this is the first time we've viewed Becky's details, we see a box to select a template:
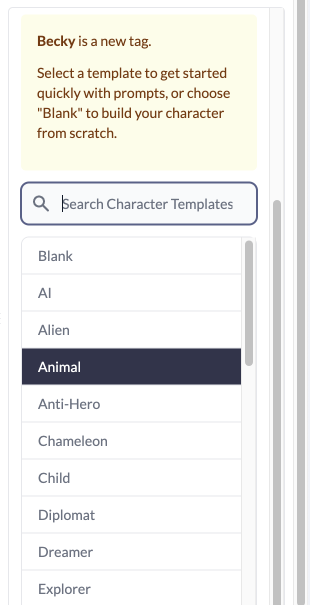
Templates are simply collections of suggested fields that you might want to fill out for a particular tag. Fields are name and value combinations, and you are able to create whatever combinations you want later. The templates are just a shortcut to help get your creative juices flowing when you are filling out information about a tag.
Our hero is a squirrel, so the Animal template seems suitable. Click it or
press enter to preview the template fields:
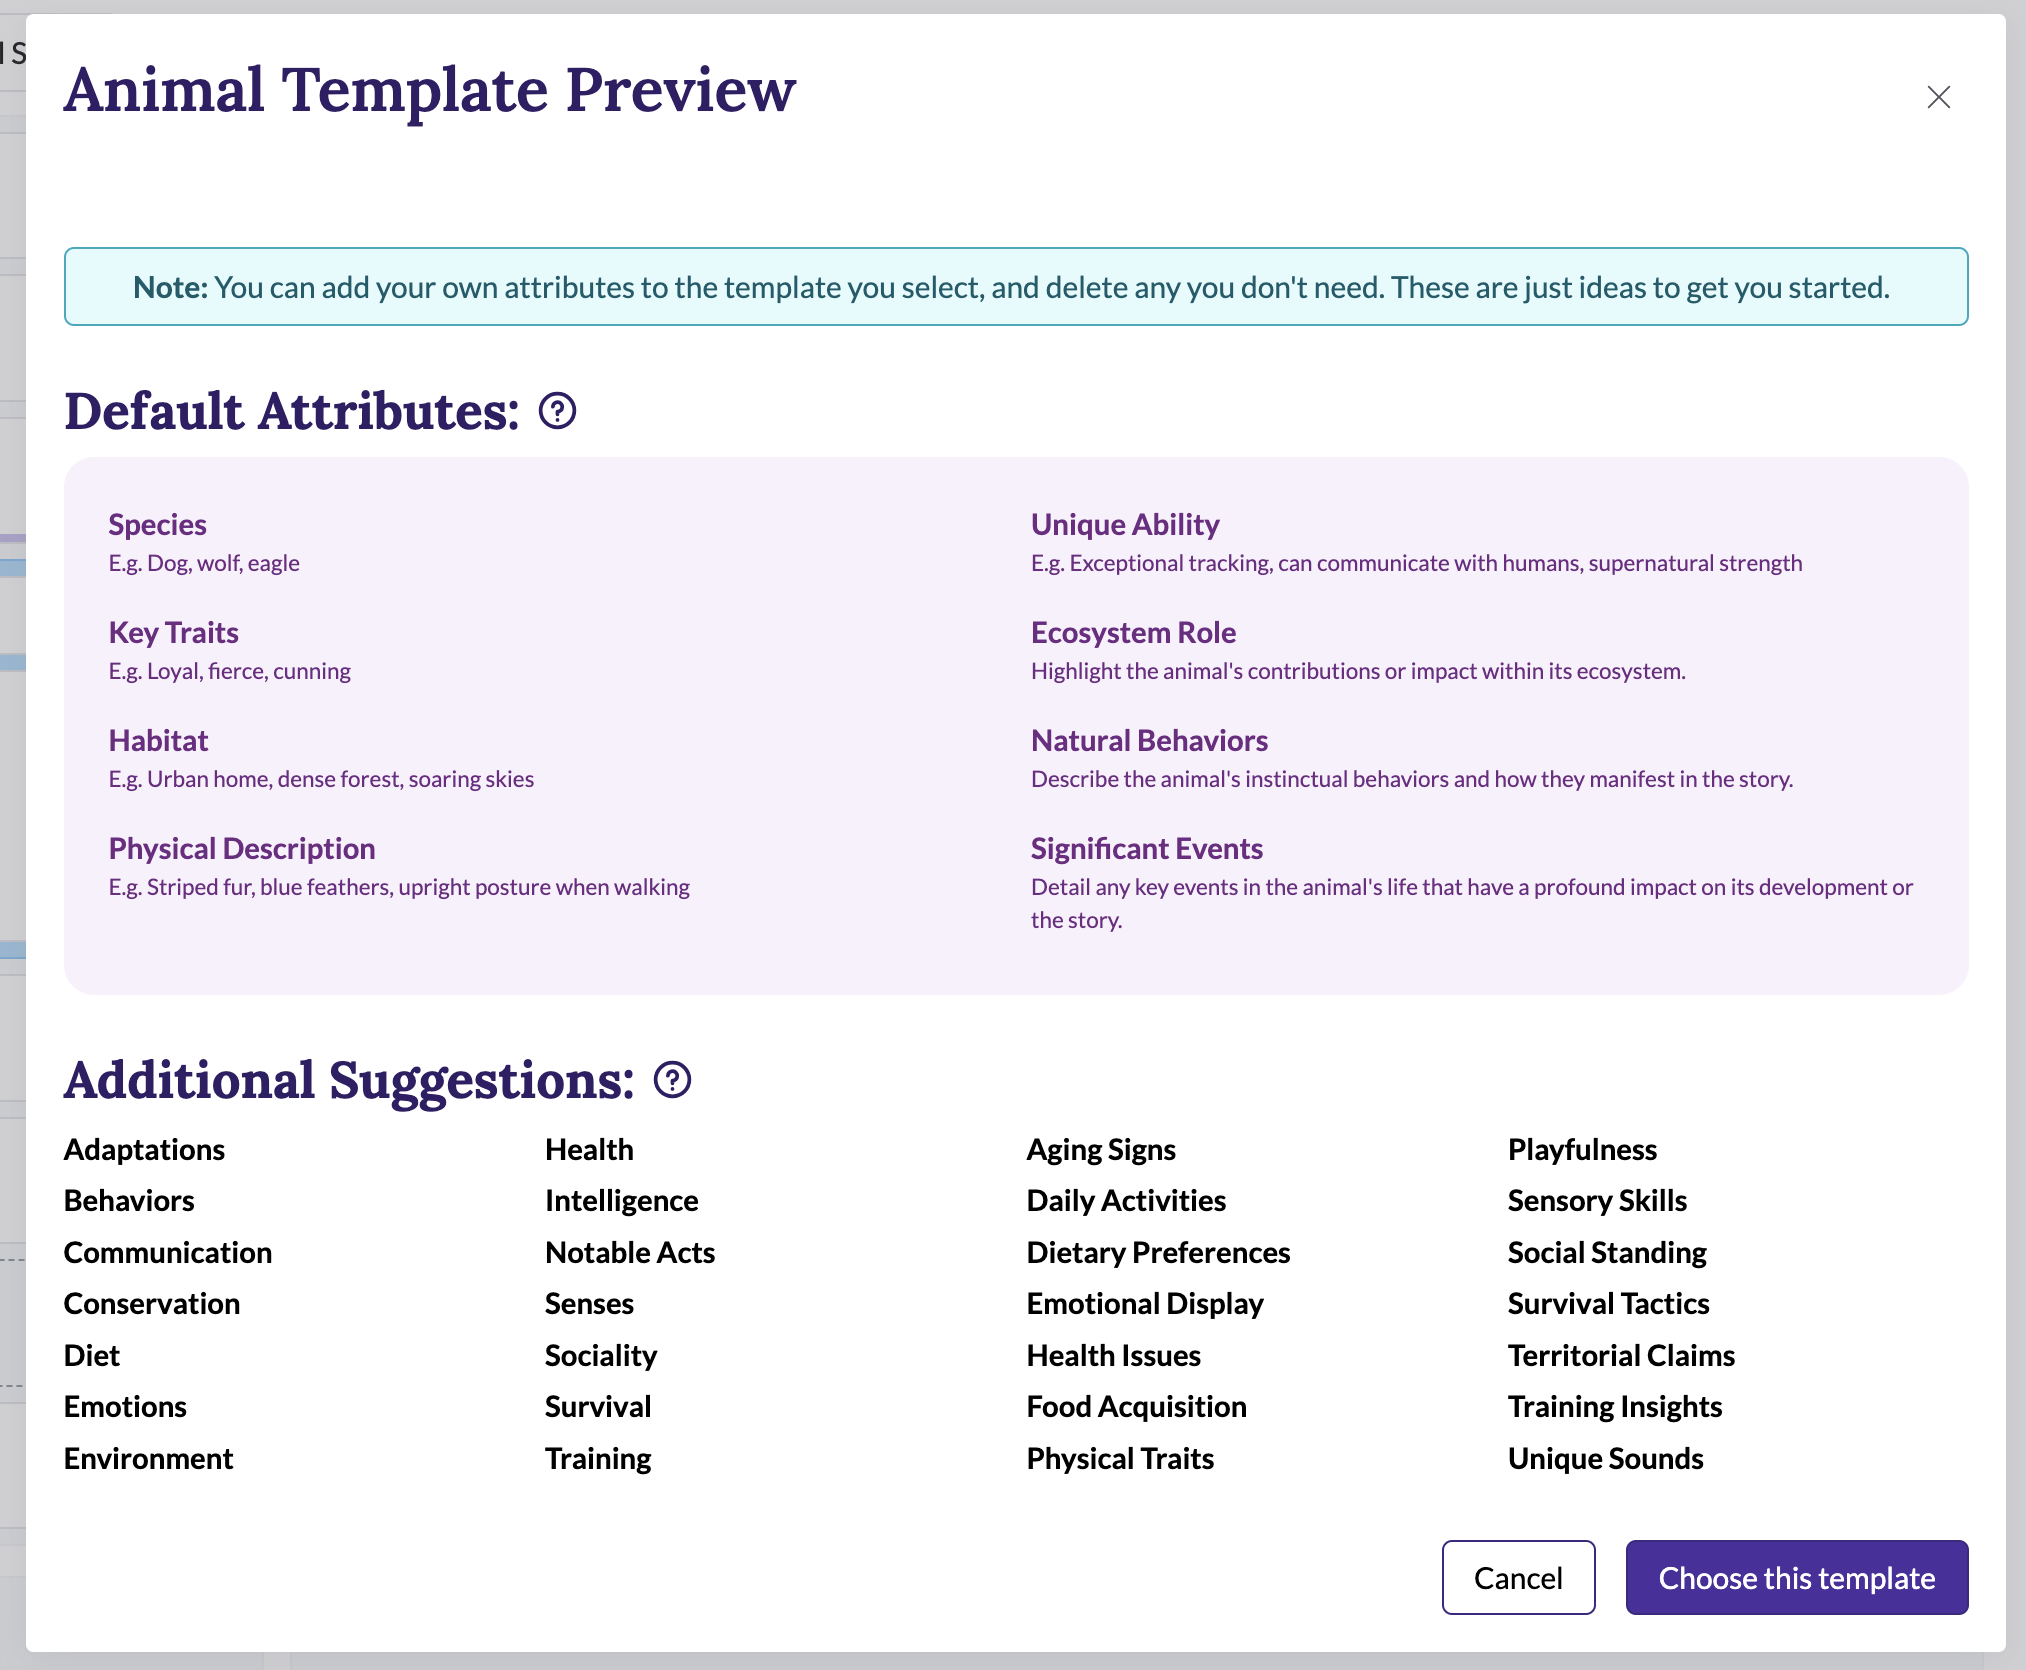
If you like the suggestions, click "Choose this template" to continue.
If you find suggested fields annoying rather than inspiring, you may prefer to
make up your own tag fields. You are certainly welcome to use the Blank
template for all your tags.
Tag Details
Once a template is selected, the details of the selected tag are collected into several collapsible sections. Here's an overview with all the sections collapsed:
We'll discuss each of these elements separately below.
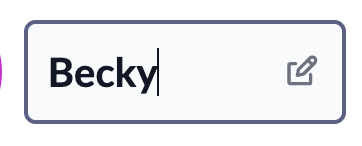
Name
If you want to edit a tag's name, just click the name and start typing. Your changes will be automatically saved as soon as you move focus away from the text field. Note, however, that this does not (currently) change any references to the tag in the book. So if your scene text already contains "Becky tore down the branch at breakneck speed," and you change the name to "Bethany", the text is still going to say "Becky". We are looking into flows for identifying and renaming tags, ranging from standard search and replace tooling to AI-powered natural language processing.
Profile Picture
Each tag gets a unique profile picture by default, to help pick it out of various lists. The default profile pictures are generated based on the tag name, so if you change the name, the picture will change (try it)! However, you are more than welcome to set your own profile pictures. To do so, either drag an image from your computer onto the profile icon, or click the icon and select an image from your device using the traditional "Open File" dialog that pops up.
Either way, once you have selected the image, the view will change to a circular crop tool so you can select the portion of the image that should be used for the profile image:
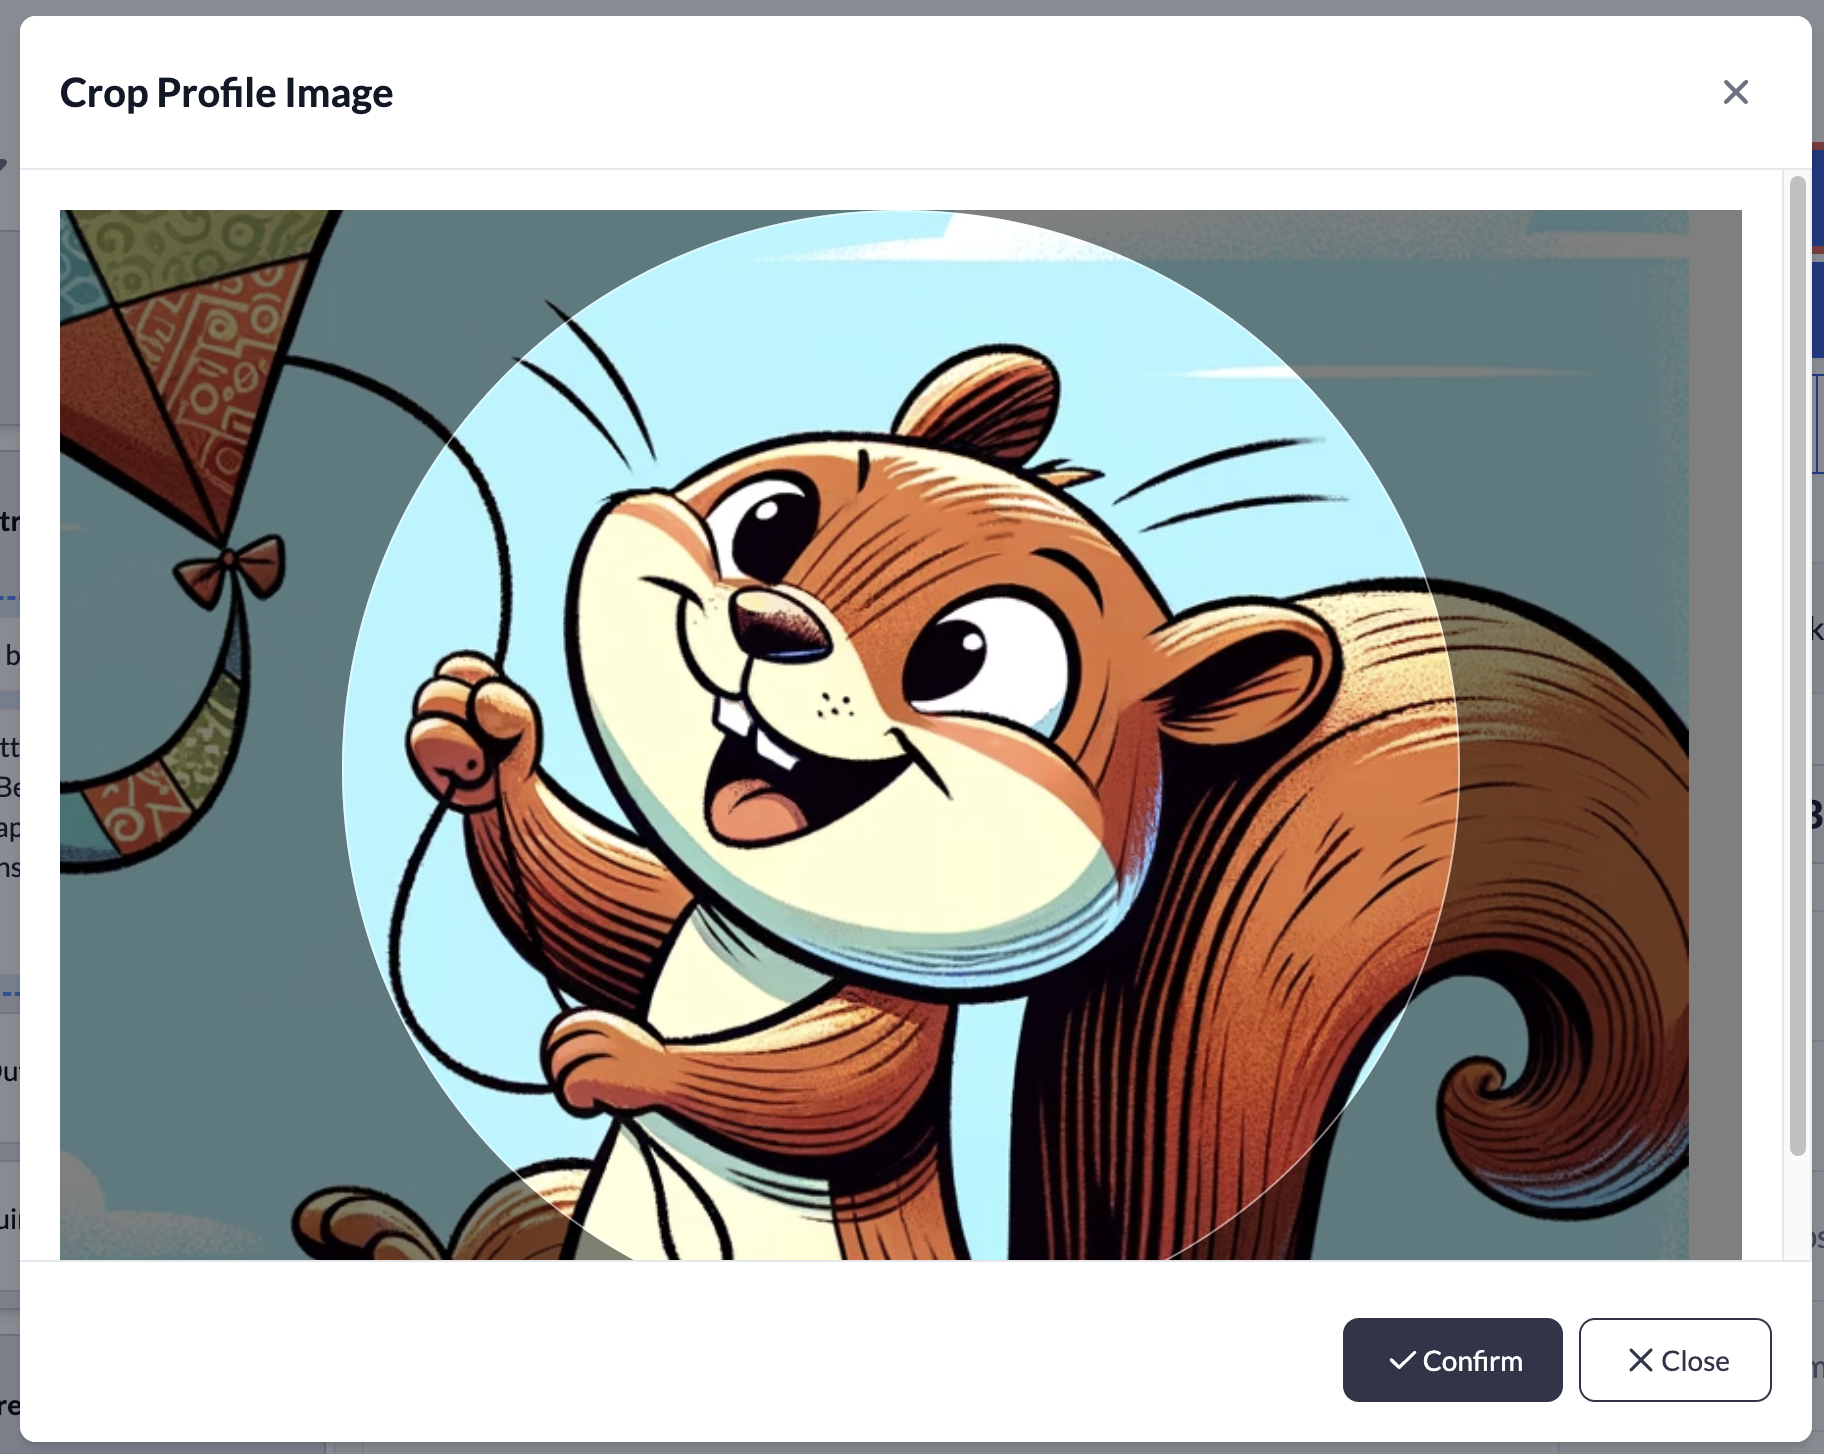
Use the scroll wheel to zoom the image in or out and click and drag to move the image relative to the crop circle.
Click Confirm to replace the autogenerated image with the cropped view:
The trash icon in the upper right corner (not that circles have corners...) can be used to revert to the autogenerated profile image.
You can also set a reference image as a profile image; this is discussed below.
Overview and Details
The overview and details sections are very similar, and you can use them however makes sense to you. Our recommendation is to place short (one line) descriptive notes in the overview, and longer descriptions in the details view.
If you selected a template other than "Blank" for this character, the Overview and
Details sections will be populated with some suggested fields for that template
type. For example, here are the overview fields from the Animal template:
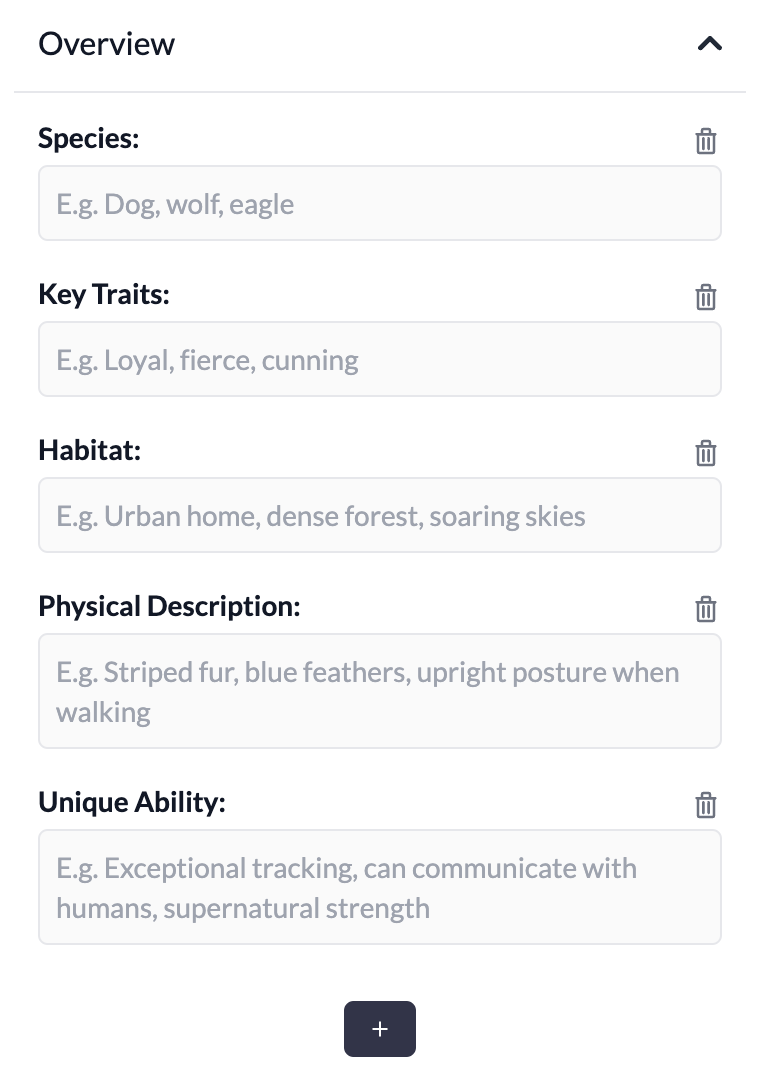
In the box associated with each label, type whatever description seems most suitable for the tag you are currently describing. These details will be vital reference as you are writing. We have made them easily accessible so you can update or add new fields while you are in the middle of your story.
You know that moment when you're writing and you say something about the character's blonde hair and then you wonder, "wait, have I described them as blonde before or are they dark haired?"
Get in the habit of updating the tag overview or details each time you mention some aspect of the tag's description or personality. Then you'll have it available for reference next time you sit down to write about that tag.
If any of the template fields don't suit the tag you are currently describing, just delete the field using the trash icon.
Adding a field
To add a new field, click the plus button  at the bottom of the
"Overview" or "Details" section.
at the bottom of the
"Overview" or "Details" section.
You will be shown a little form that allows you to add the name and a description of the new field for this tag. You can type in any name you like, but we have populated the "Characteristic" drop-down with a few suggested values. Typing into the box will filter the list. Here I've shown all tags that contain "co":
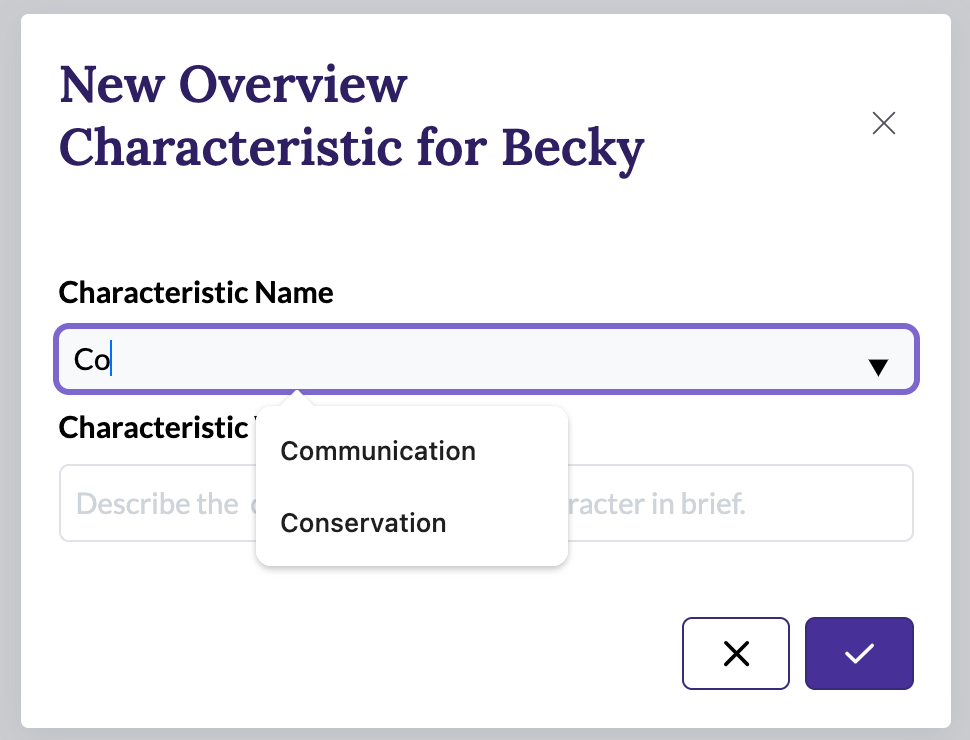
Once you've filled it out, click the "Check" button to store the field in the relevant section.
You can edit the value whenever you want by clicking into the box and changing it; it will save automatically.
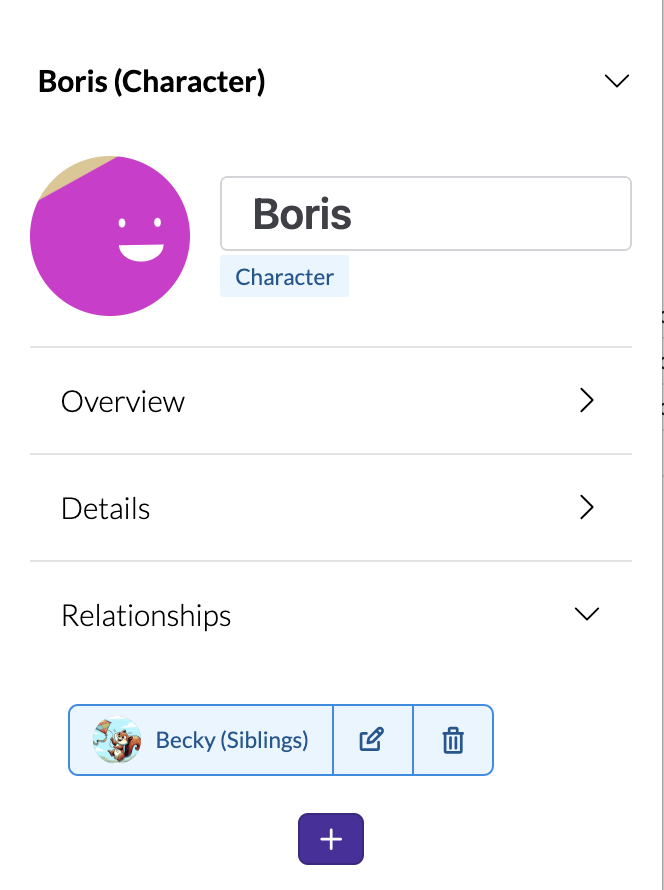
Relationships
You've already seen how tags can be related to scenes, but they can also be related to other tags. This is kind of analogous to the "mutual friends" list in a social media profile. Each relationship has a name and description so you can document exactly how the two tags in question are related to each other.
When you first expand the Relationships section, you'll see that there are no relationships yet:

Use the plus button under the "Related Tags" section to create a new relationship.
A form will pop up allowing you to select the tag to which the currently selected tag is related and enter the relevant details. For example, Becky and Boris are siblings:
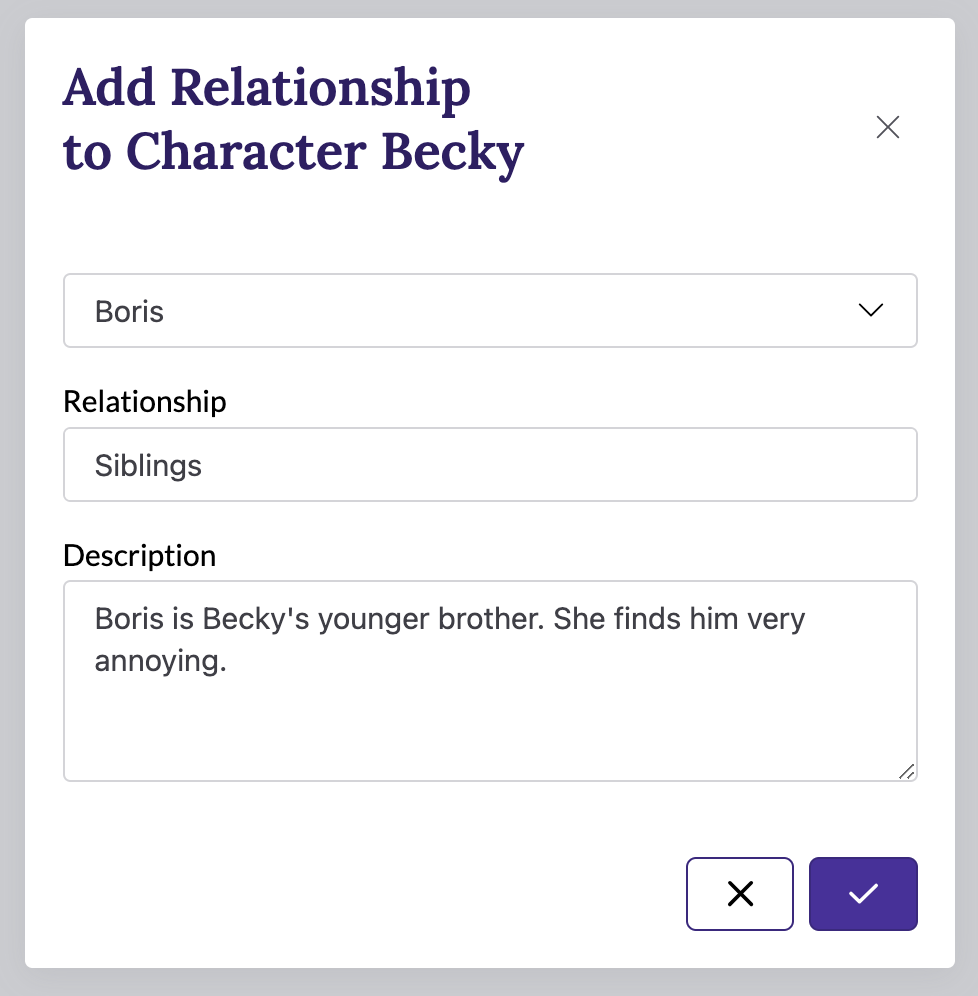
Click the 'check' button to create the relationship between the two tags.
You can click the tag's name (Boris, in this example) to select the tag view for that tag, replacing the current tag in the sidebar. Note that the relationship shows up automatically in Boris's view as well:
Hover over the character's name to see the details of the relationship in a tooltip:
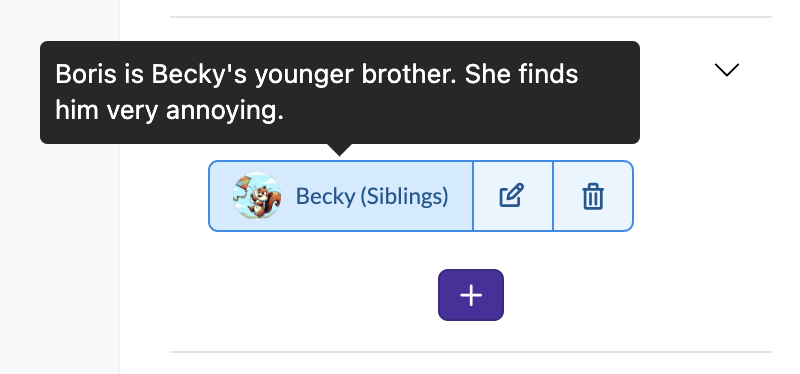
The pencil and trash icons to the right can be used to edit and delete the relationship respectively. Note that deleting the relationship does not delete the related tag; it is the equivalent of "unfriending", not deleting the other user's profile.
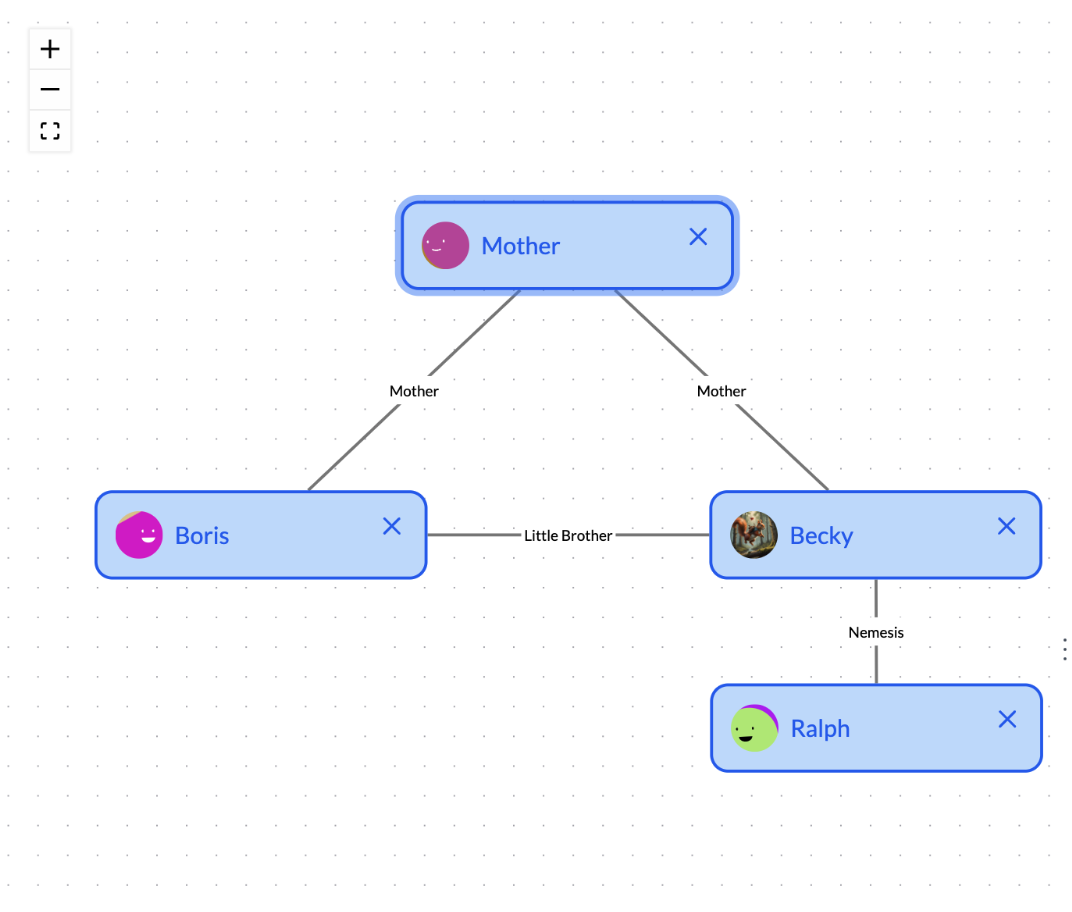
Tip: You can use the Tag Relationship Viewer to visualize tag relationships.
Here is an example of a map made with the tag relationship viewer. See the docs for more information.
Reference Images
Reference images allow you to associate additional pictures with your tags. These may be images you draw yourself, or borrow from the web (image search engines are amazing for finding good reference photos). I find them useful for storing (poorly) hand-drawn maps of my fantasy worlds.
The pictures will not be published with your novel and are just for your personal reference, so use whatever images inspire or motivate you to think about the tag in the right fashion.
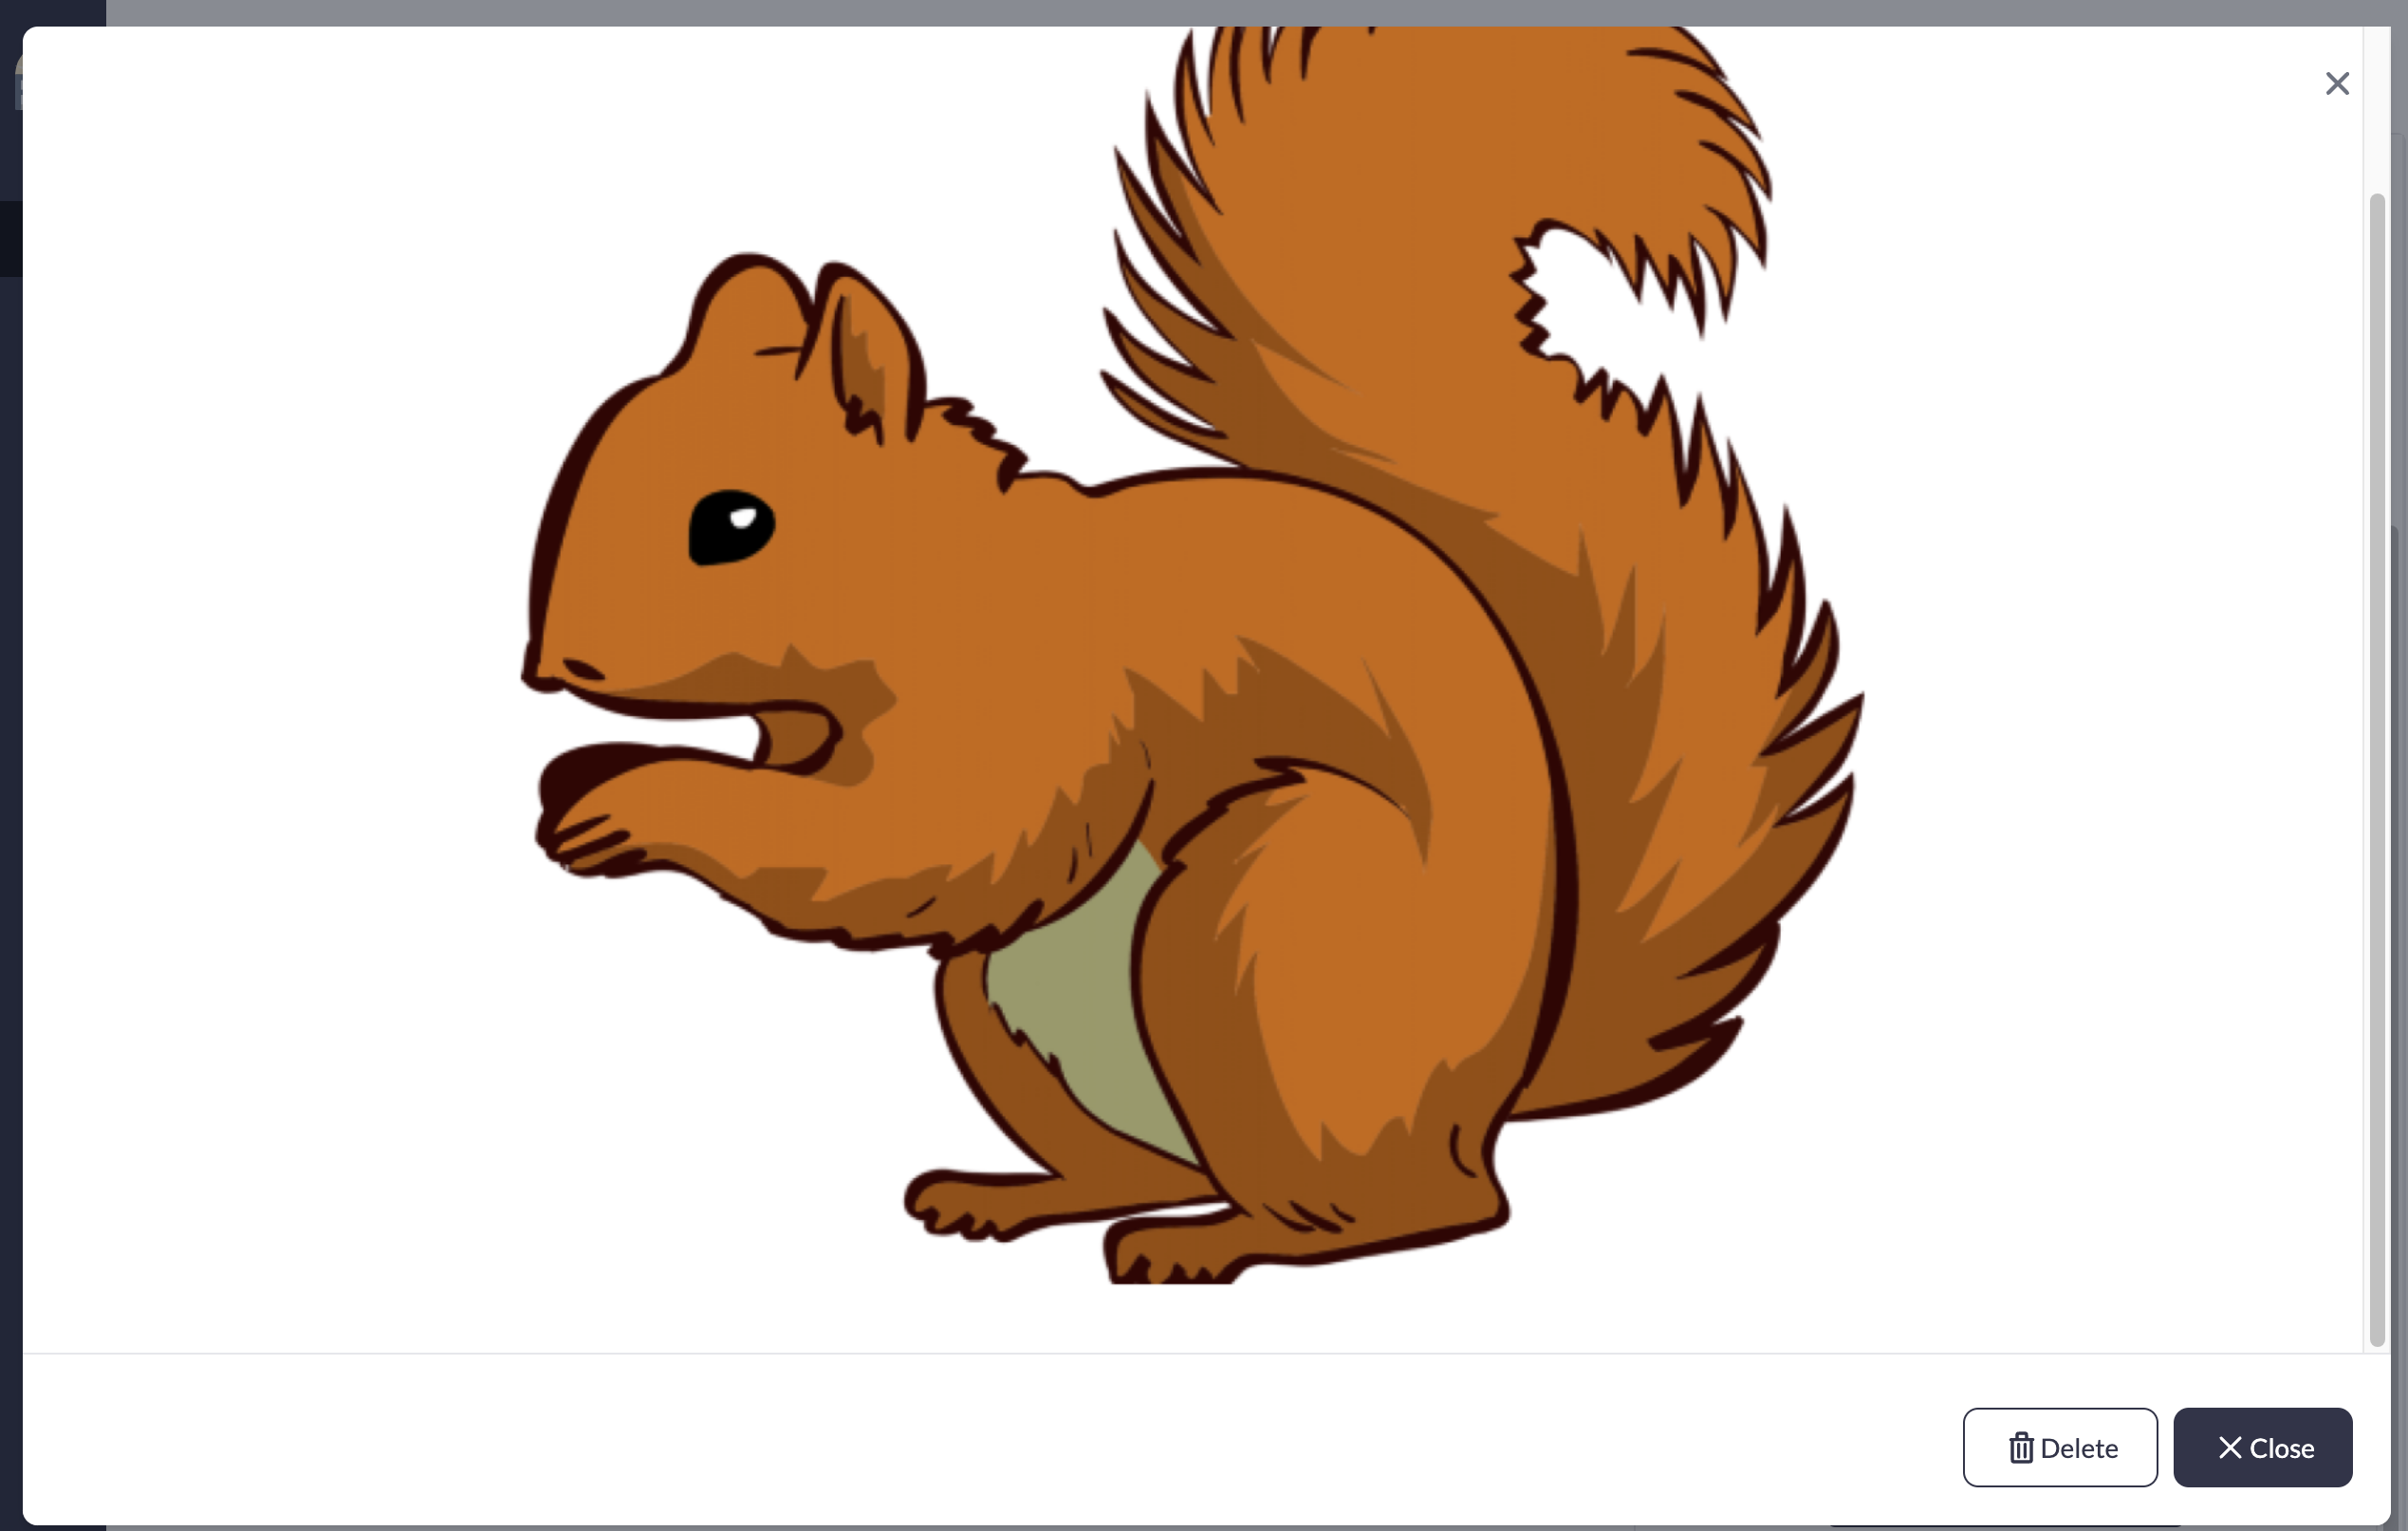
To upload a reference image, simply drag an image onto the "Reference Images" box or click it to show the standard "upload image" form. I borrowed this picture from a search for "free clipart squirrel". I think it looks like Becky, don't you?
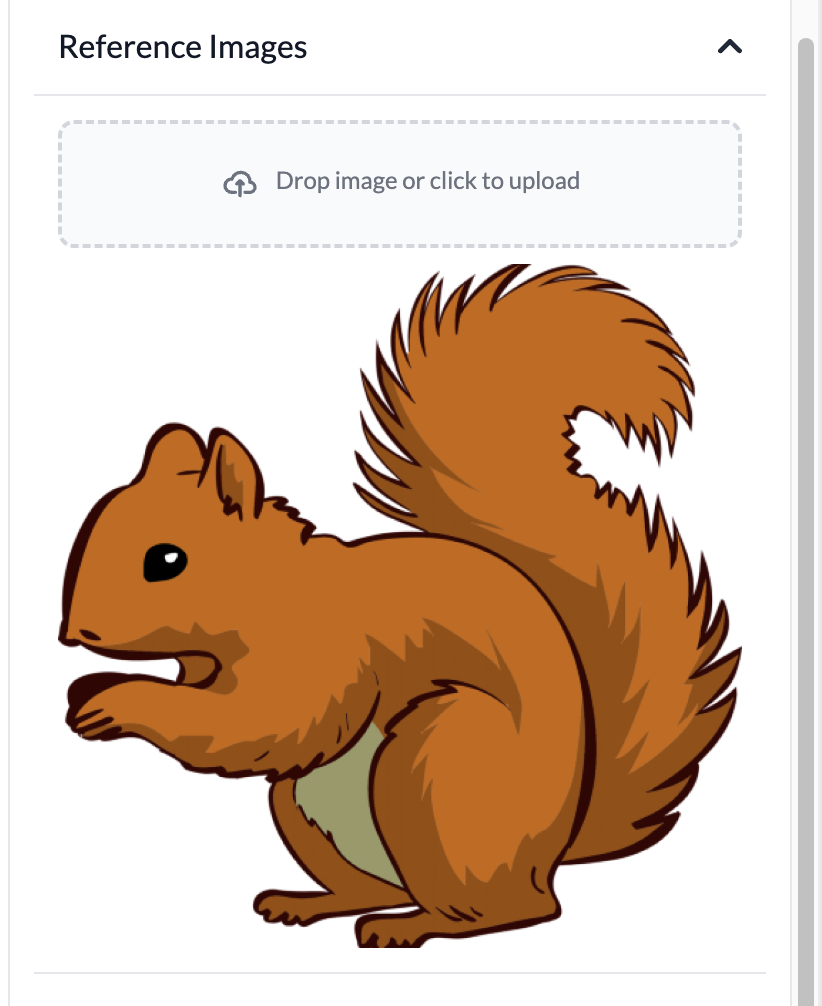
You can click the reference image to see an expanded view of it (depending how large the original source image is). The expanded view also allows you to delete the image if it no longer seems suitable.
You can drag as many pictures as you want in, but we encourage you to be reasonable. Too many (or too large) pictures could slow down the load time for your tag, interrupting your flow when you want to quickly refer to the tag details view.
If you are a Pro user, you can also generate reference images based on your description. This can be a great way to discover if your description is detailed enough. If an AI can understand your description, then a human can as well.
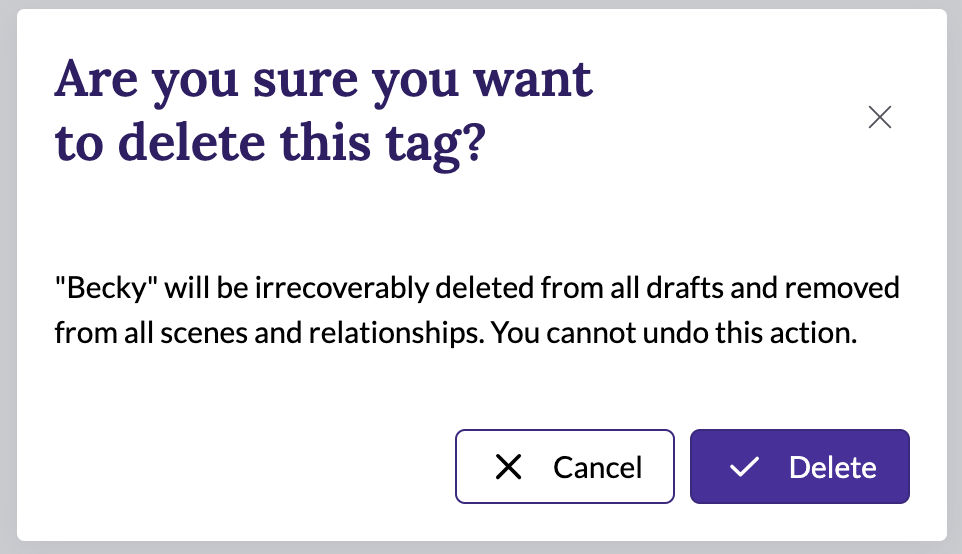
Delete Tag
Click the delete tag button at the bottom of the tag sidebar section to completely remove the tag from the book. This is a destructive action, so we show a delete confirmation dialog to avoid accidents:
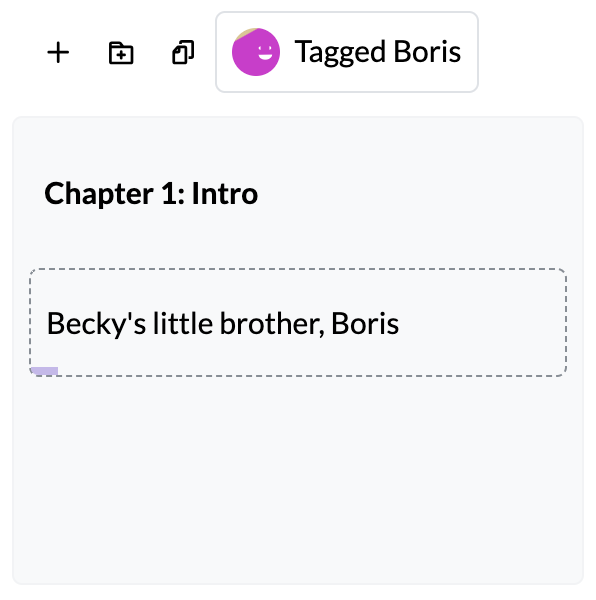
Filtering scenes to selected tag
You will commonly want to see a list of scenes that are associated with a given tag. This is helpful both for getting an overview of where the character is used and for digging into the details of their story arc.
This is easily done by using the filtering menu in the outline toolbar. If you
set the filtering option to Selected Tag, only scenes that the currently
selected tag is attached to will be visible in the outline. Here, I've filtered
the outline to only show scenes that have the Boris character tagged. In this
case, there's only one scene (the secret scene about Becky's brother):